
If you're experiencing problems with your game session, whether lagging, the quality of the video, or freezing, we recommend passing the MTR test to get to the bottom of the issue.
Pay attention, that you should also check our connection improvement tips and try to apply as many of them as possible before launching games through Boosteroid.
Since cloud gaming is a very complex technology and the proper functioning of any cloud gaming service depends on many factors, it's necessary to establish what exactly prevents you from comfortable use of Boosteroid.
Windows
Extract the contents of the .zip file to your desktop.
Open the WinMTR folder, then open the folder that matches your version of Windows (32-bit or 64-bit) and run WinMTR.exe.
Launch the game you want to play.
Enter the IP address you want to test in the Host field.
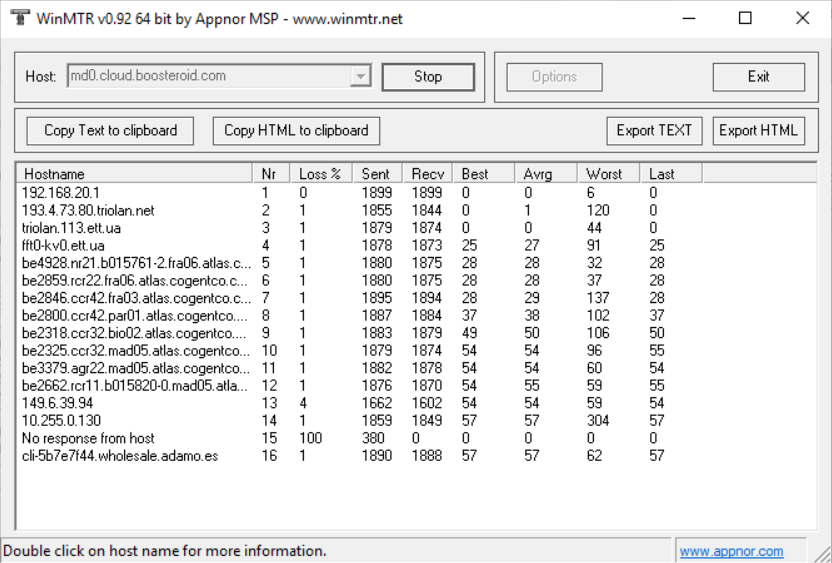
You can learn how to get the IP address of the Boosteroid server in this article:How to get the IP address of a Boosteroid server? Actively play the game for about 10-15 minutes and check if more than 500 packets have been sent (the fourth column should have a number greater than 500. If so, take a screenshot of the WinMTR window, if not, continue playing until the value is greater than 500.
Reply to the chat and attach a screenshot. You can see an example of the screenshot below.
MacOS
Open the terminal window (search for the Terminal in Finder or Launchpad/press Command + Space and type Terminal) and install homebrew on your device by running the following command:
/bin/bash -c "$(curl -fsSL https://raw.githubusercontent.com/Homebrew/install/HEAD/install.sh)"The terminal may require entering the password of your macOS device to initiate the installation.

Once such text appears, you'll need to press ENTER or RETURN buttons to finish the installation;
After installing Homebrew, you will need to run the following three commands:
MacOS (M1/M2)echo '# Set PATH, MANPATH, etc., for Homebrew.' >> /Users/YOURNAMEHERE/.zprofile echo 'eval "$(/opt/homebrew/bin/brew shellenv)"' >> /Users/YOURNAMEHERE/.zprofile eval "$(/opt/homebrew/bin/brew shellenv)"MacOS (Intel)
echo '# Set PATH, MANPATH, etc., for Homebrew.' >> /Users/YOURNAMEHERE/.zprofile
echo 'eval "$(/usr/local/bin/brew shellenv)"' >> /Users/YOURNAMEHERE/.zprofile
eval "$(/usr/local/bin/brew shellenv)"
Make sure to replace the "YOURNAMEHERE" value with the name of your device.
Once you've added Homebrew to your PATH, you can install the MTR using the following command:
brew install mtrAfter entering the installation command, you should see such a message, that confirms the successful MTR installation;
You can now perform an MTR test with our servers. You can do that by entering this command:
sudo mtr kv1.cloud.boosteroid.com -c2000You'll need to change the "kv1" value to match the server you are using in your current session.
You can learn how to get the IP address of the Boosteroid server in this article:
How to get the IP address of a Boosteroid server? The terminal may require entering the password of your macOS device to initiate the installation.
Actively play the game for about 10-15 minutes and check if more than 500 packets have been sent (the fourth column should have a number greater than 500. If so, take a screenshot of the WinMTR window, if not, continue playing until the value is greater than 500.
Reply to the chat and attach a screenshot. You can see an example of the screenshot below.


Linux
You can use the instructions for macOS, but the commands may be different depending on your system. So if our instructions don't work for you, try searching the internet for information on how to run the MTR test on your version of OS.